Did you know kids can design and sell their own Roblox clothing—and even earn Robux from it? With this step-by-step guide, your child can start their own virtual fashion business today!
How to Make Clothes in Roblox (Full Guide) video below!
Your Roblox gamers have probably thought about how great it would be to be able to create their own shirts and clothes in Roblox, or maybe they’ve wished they could design the perfect outfit for their avatar.
Either way, learning how to create clothes in Roblox is a great way to add their own personal touch to their gaming experience.
And beyond just creating clothes, we are going to learn about the different types of clothing, and then, how kids can monetize it all so they can make real money from what they’re doing.
So, let’s jump right in!
Steps to create clothes on Roblox:
- Step 1: Create a Roblox Account & Get Robux
- Step 2: Access the "Create a Shirt" Tool
- Step 3: Download & Customize the Template
- Step 4: Upload Your Shirt to Roblox
- Step 5: Preview Your Design in Roblox Studio
- Step 6: Sell Your Shirt & Earn Robux
Step 1: Set Up Your Roblox Account & Get Robux (00:00 - 01:23)
Before designing clothes, your child will need:
- A Roblox account
- At least 10 Robux to upload designs
What is Robux?
Robux is Roblox’s virtual currency, used to buy in-game items—including clothing!
- Purchase Robux with real money
- Earn Robux by playing games and selling items
- Receive Robux through a Roblox Premium membership
Learn more about Roblox slang
Detailed Instructions: Now, kids won’t need a ton of Robux to get started here, but they’re going to want at least 10 just to upload to servers. More on this bit to come, but it’s worth a mention before you get going.
![]()
Let’s log into a Roblox account, and then on the left-hand side menu, click on “Avatar.” Avatar is where they’ll create their own Roblox avatar, but it’s also where they’re going to be finding the “Create” template so that they can make the file they’re looking for.
Step 2: Access the "Create a Shirt" Tool (01:24 - 02:40)
- Log into Roblox and go to Avatar (left-hand menu)
- Click Clothing → Shirts
- Press the Create button
- Select "Create a Shirt"
Types of Roblox Clothing:
- T-Shirts: Simple image + solid background
- Standard Shirts: Fully customizable (logos, patterns, colors)
Pro Tip: Standard shirts are more popular and sell better!
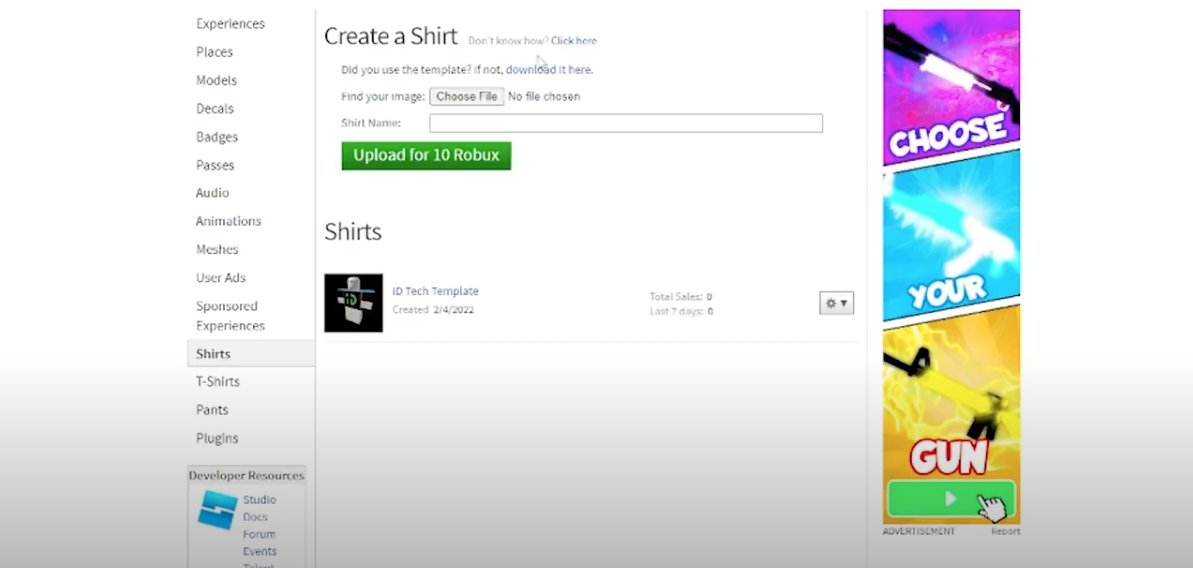
Detailed Instructions: Now by clicking on “Clothing” along the top row, and then “Shirts” that’s where we are going to be getting our template from. On the right-hand side, there should be a button that says “Create.” Let’s click that button, which is going to bring up the option to “Create a Shirt.”
Before going further, let’s talk about the different kinds of shirts. In Roblox you can choose between two different types:
T-Shirts can only have an image and a solid color behind it. Thus, it’s rather limited in terms of what kids can actually create.
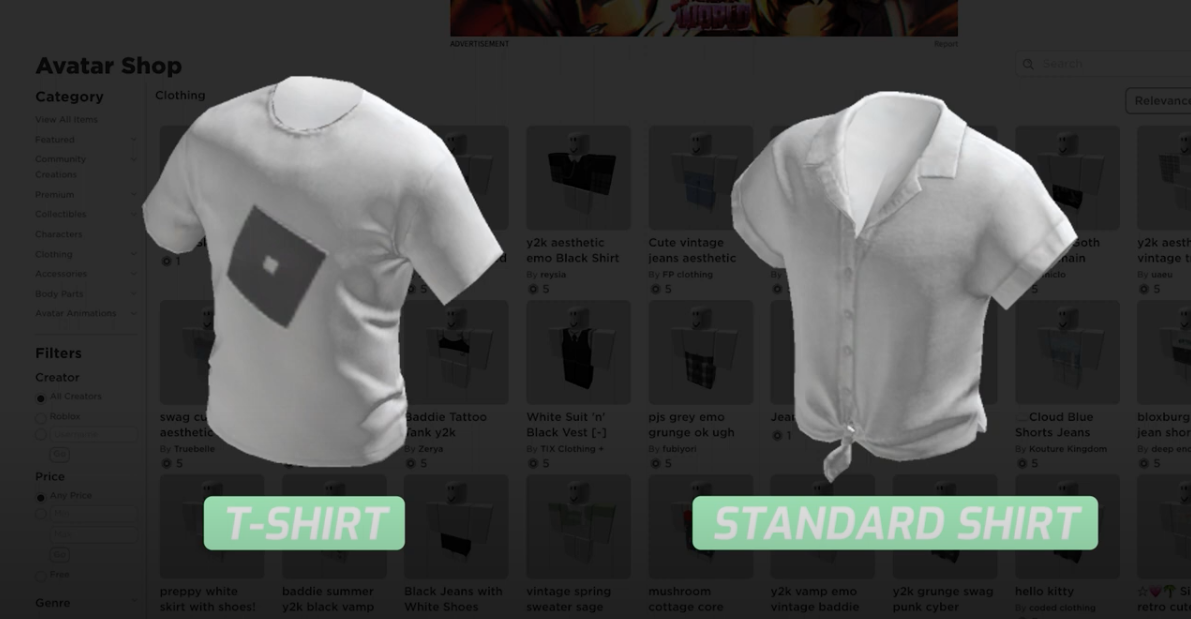
With the standard shirt, though, creators can do pretty much whatever they want with in terms of the design, logo, and colors. Thus, the standard shirt is typically more appealing to people who are looking to buy clothing in Roblox.
Check out this Roblox Papercraft Avatar Template & Activity
Step 3: Download & Customize the Template (02:41 - 04:05)
- On the "Create a Shirt" page, find the template download link
- Save the template image to your computer
- Open the template in Photoshop
- Design your shirt by editing the different sections of the template
Understanding the Template:
- Each colored box represents a part of the Roblox avatar (front, back, arms, sides).
- Keep edges clean for a seamless design!
- Save your file as a PNG to maintain transparency.
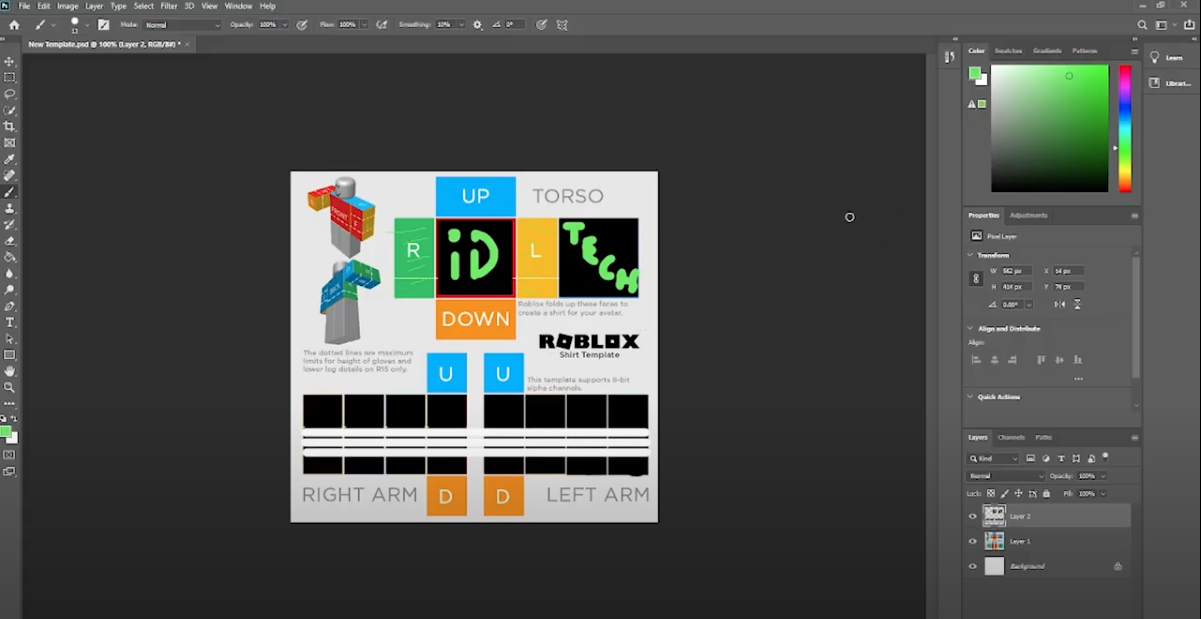
Detailed Instructions: Back on the “Create a Shirt” screen you’re going to see a message that says “Do you see the template? If not, download it here.” Click “download it here” and there will be this image as shown below, which is the Roblox shirt template.
Upon first glance, this is going to look pretty confusing, so let’s break it down!
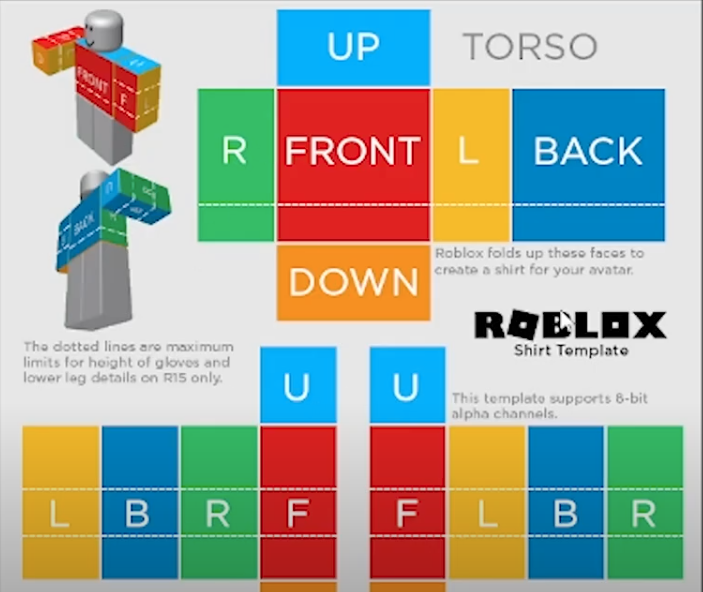
First, the different colors - green, red, yellow, orange, blue, etc. - represent the different aspects of the Roblox character body. So, the front of the torso is red, “up” is basically the top or shoulder area; left and right is the inside portion of the torso, and back is, well, the back. The bottom is the bottom portion that isn’t really seen unless the Roblox character is running and moving around.
On the bottom half of that template you’re going to see additional t-shapes for both the right and left arms, which again will follow the color pattern of red being front, etc.
Now, to download and update the template, you can do so with Photoshop. Right-click on the image and then click “save image as” and then save anywhere you’d like.
Next, open up Photoshop and the file that was just downloaded and then update the template to your designer heart’s content.
Your shirt graphic or design can take many forms—tuxedo, business suit, blouse, winter coat, or something else!
To save, go to “File” and then “Save.”
Step 4: Upload The Shirt to Roblox (04:06 - 05:40)
Return to the "Create a Shirt" page
- Click Choose File and select your design
- Name your shirt
- Click Upload for 10 Robux
- Wait for Roblox’s approval (can take a few hours)
Detailed Instructions: For creators to get their file back into Roblox, go back to the website and locate the green “Upload for 10 Robux” button. Don't have them click it yet—just make sure they’re on the screen where you can see that option.
(And as mentioned, 10 Robux isn’t a ton of money, and works out to be an inexpensive $.13, give or take!)
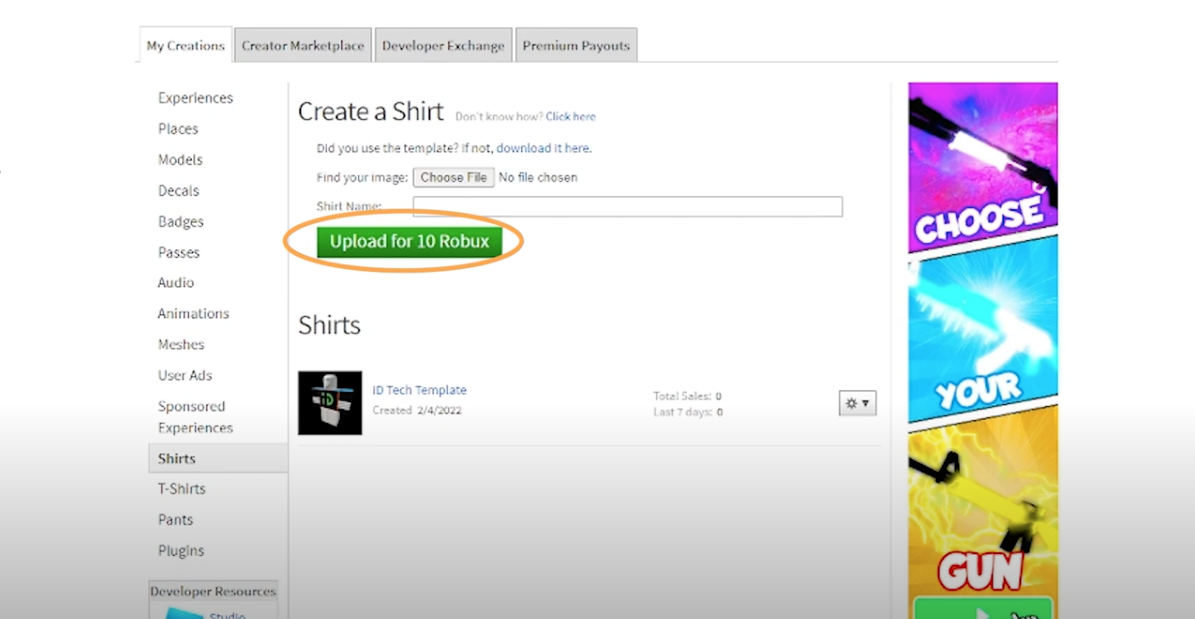
Then, “Choose File” and select the template they just made and saved. You’ll see the “Shirt Name” field and kids can name the shirt whatever they want.
When ready, click that “upload” button and then again to confirm, “would you like to upload your shirt for 10 Robux?”
Once done, there will be an icon and the name of the shirt under “Shirts.” You’ll also notice that the image for the shirt is simply a piece of paper with a dotted outline—this means that the shirt is currently under review by Roblox, just to make sure it’s appropriate and able to be posted. This might take a couple of hours for approval.
Step 5: Preview Shirt Design in Roblox Studio (05:41 - 06:58)
How to Preview Your Shirt in Roblox Studio:
- Open Roblox Studio
- Click Create → Baseplate
- Go to Avatar → Build Rig → R15 → Block Rig
- In the Explorer Window, find Dummy → Clothing
- Paste the Shirt Asset ID into the ShirtTemplate field
- Your shirt appears on the dummy model!
Detailed Instructions: Kids can now open Roblox Studio by clicking the “Create” at the top navigation bar. Then, they can click “Start Creating” and finally “Baseplate” to head to a blank screen. Once that page loads, go to “PLUGINS” in the main navigation menu.
From there, click “Build Rig,” which will basically insert a dummy character to throw clothing on as if someone was really playing. Choose “R15” or “R6” which is whatever type of model kids want to use. For now, let’s click “R15” and then “Block Rig.”
Now the dummy Roblox character is showing on the screen. Kids should then click the plus sign in the explorer window next to “Dummy." Here they’ll then look for “Clothing” and in the left-hand “Inventory” they can right-click on the shirt, click “Copy Asset ID” and then paste the ID right next to “ShirtTemplate” in the “Appearance” section. Once they press “Enter” the shirt will show up on their Roblox dummy model.
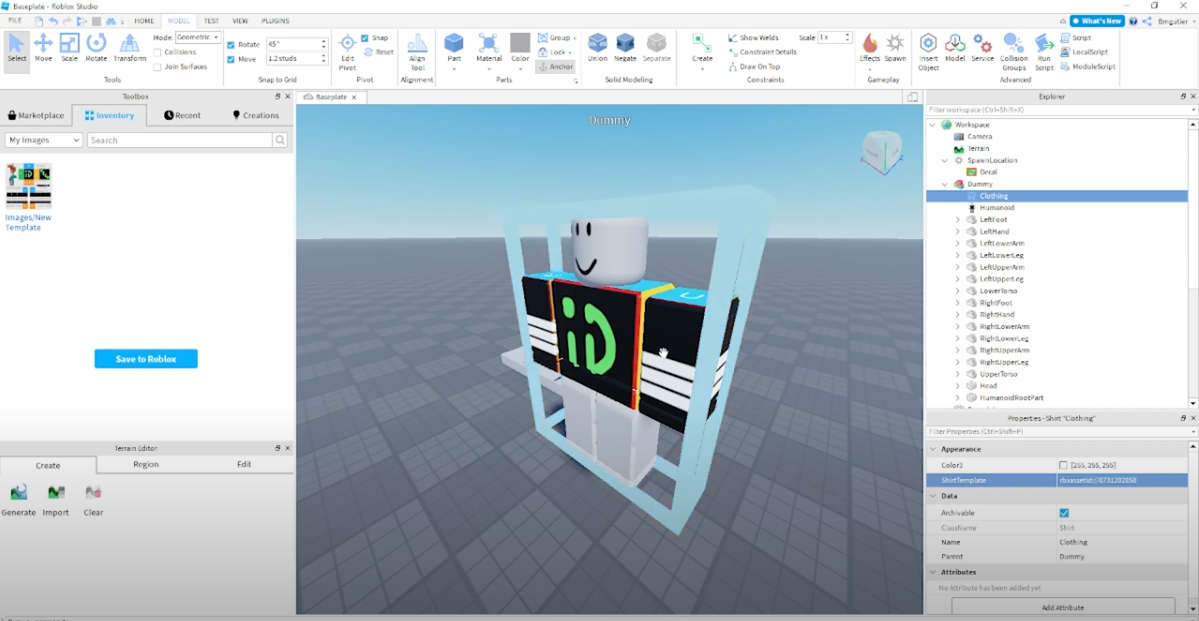
The whole reason for this is for kids to see how their shirt looks before they monetize it. If they’re going to put a product out there for others to see and download, they’ll want to make sure it goes out to the masses.
Step 6: Sell The Shirt & Earn Robux! (06:59 - 08:15)
- Go to Avatar → Clothing → Shirts
- Find the shirt you uploaded
- Click the gear icon next to your shirt
- Select "Configure"
Enable Sales & Set a Price:
- Click the "Sales" tab
- Toggle “Item for Sale” to ON (it should turn green)
- Set a price in Robux (minimum: 5 Robux)
Pricing Tip: Start at 6-7 Robux to attract buyers while still making a profit. Remember, Roblox takes a percentage of every sale.
Finalize & Save the Listing
- Click "Save" to confirm pricing
- A green bar will appear saying "Successfully Updated"
- Your shirt is now live in the Roblox marketplace!
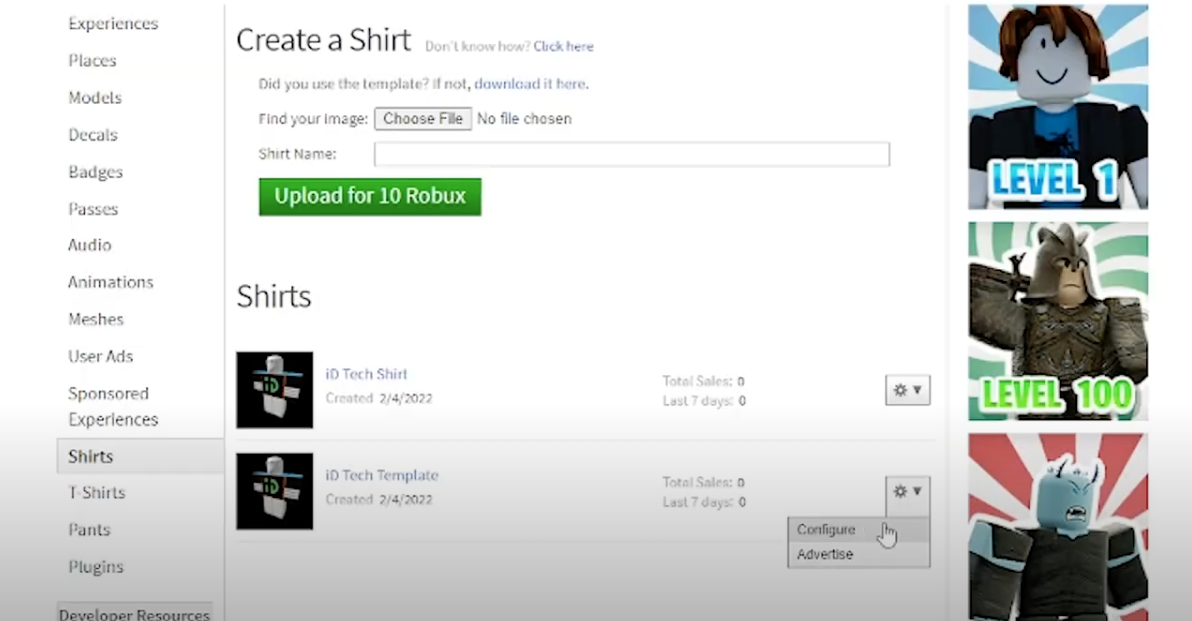
Detailed Instructions: Now, let’s go back to the Roblox website and then select “Avatar.” Have kids click on “Clothing” and then “Shirts.” You should see the shirt they created—click on it. Again, if the shirt design isn’t here it’s most likely still in the processing and approval stage.
Once a shirt has been approved, go to your shirts and click the down arrow next to the gear icon. The options are "configure" and "advertise"—click “configure.” You’ll land on the “general” tab where you can make sure the shirt your child wants to monetize is in fact the one you’re currently dealing with.
When confirmed, click “sales” under the “general” tab and you’ll see the “configure shirt” screen with a toggle button on the right-hand side of the “items for sale” line. Click the toggle bar, which will turn green and then bring up a pricing screen. Once your child knows how much they’d like to sell their shirt for, enter the amount.
Pro Tip: you don’t want your child to price their shirt so expensive that nobody will buy it, but on the other hand, you don’t want the shirt to be so inexpensive that they’ll be leaving money on the table by selling at a lower amount. One guideline is to start selling shirts around 6 or 7 Robux. Also remember that Roblox will take a small percentage of your sale (and that the minimum price you can set is 5 Robux).
Once “save” is clicked, if all goes well, you’ll see a green bar that says “successfully updated” which is great! At this point, the shirt is ready to be purchased and downloaded by others.
That's it! (Or is it?)
So to recap, we have covered how to make shirts in Roblox, how to upload those designs, and then of course, how to monetize!
Have a child who is stuck or wants to take the next step? Check out our Roblox summer camps or Online Private Lessons featuring Roblox and Lua, and more!
You can also check out our additional Roblox resources:
Creating NPC Dialog in Roblox
How to Make a SpawnLocation in Roblox
Educational Benefits of Roblox