![How to Make a Parkour Obby in Roblox [with VIDEO]](https://s3.us-west-1.amazonaws.com/idtech-2018-media-prd/how_to_make_an_obby_header_png_321a5c10c8.webp)
You know it—the obby is a staple of any awesome Roblox game! And while every Roblox player knows that obbys are fun to navigate, in this tutorial, Nikko and Costa, the Taco Bros, show us that they’re even more fun to create using Roblox Studio!
As a platform, Roblox attracts 64 million monthly users for good reason. It’s incredibly fun to play, as we recently highlighted with the iD Halloween Block Party in Roblox. Its engaging format has also inspired countless young coders and creatives to make awesome games (and even a little money along the way.)
Having attended iD Tech camps in person, Nikko and Costa recently completed our online Roblox course, and in this video, they share their knowledge in an easy-to-follow tutorial.
Kids will learn how to create an in-game classic: a parkour obby, which consist of ghost blocks - which are invisible to players - and “kill” blocks, which are blocks that “kill” players if they run into them.
(Check out or Roblox list of terms.)
Follow along with the easy steps in this YouTube video below, or with the written instructions that follow to create your own parkour obby and Roblox masterpiece!
How to create a parkour obby in Roblox Studio
1. Select the Baseplate Template
When in Roblox Studio, you’ll have a variety of templates to choose from. For an obby, it’s recommended to choose the Baseplate template, which is the first template you’ll see.
2. Place Blocks
To get started, begin placing blocks—which can be done from the home section of the toolbar located all the way at the top of the screen.
A block can be created by selecting the “Part” icon to create a simple square, or by clicking a different shape option from the drop down menu (sphere, wedge, or cylinder).

Click on the location on your screen where you would like to place the shape, and then create the shape via one of the two methods mentioned above.
3. Add a Spawn Location
Next, to add a spawn location, hover over the sidebar and click the plus sign next to “Workspace.” In the list, look for “SpawnLocation,” and then click it to place your spawn pad.

Once the pad appears, you can drag and reposition it anywhere on the screen. Congrats! Your obby creation has begun!
4. Create Ghost Blocks
Start creating a ghost block by clicking the “Part” icon, and selecting the shape you’d like to use. Then, click on “Properties” and “Behaviors” at the bottom of the sidebar, and turn off by “CanCollide” by unchecking the box .

Test out if the ghost block works by clicking “Play” at the top of the screen. If your character can walk through the ghost block you just created, it worked! If not, double check your work so far by taking a look at the steps above.

Then, press the “Stop” button at the top of the screen to move on.
Now would be a great time to save your work!
5. Create Kill Blocks
The “kill block” is a signature of any awesome Roblox game, and it’s essential for any aspiring Roblox entrepreneur. Start by clicking the block (in this example, the rectangle to the left of the spawn pad).
Read More: How to Turn on Team Create in Roblox Studio
In the sidebar, hover over the “Blocks” icon, then click “Script”. This will create a new tab like the one at the top left corner of this example.
Delete the line of code you see.
(Kids can jump into learning more about Roblox scripting.)

Then, replace it by copying and pasting this code:
script.Parent.Touched:Connect (function(hit) local Humanoid =
hit.Parent:FindFirstChild (“Humanoid”) if Humanoid then Humanoid.Health = 0 end end)
Click on the “Baseplate” tab at the top left corner of the screen and press “Play” to test out your “kill” block.
You will know if your “kill” block works if it destroys your character when they walk into it. This is when your parkour map gets really exciting!
Press the “Stop” button and save your work!
6. Anchor Floating Blocks
Since you now know how to make ghost and kill blocks, it’s time to learn how to keep floating blocks suspended in the air. Without this steps, all of the blocks you’ve created will fall to the ground!
First, to make blocks hover in the air, simply click on them and drag upwards.

Then, go to editor mode and select each airborne block. Next, click on the “Behavior” button in the bottom left sidebar and select “Anchor.”

Test your work by pressing “Play”—the floating blocks should stay in the air!
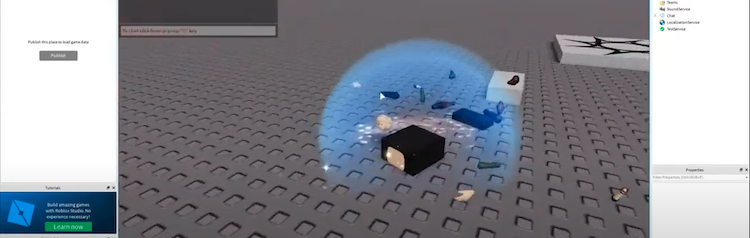
7. Create Terrain
No obby would be complete without cool terrain. To add this feature, click on “Terrain Editor” on the left sidebar. Click on the “Edit” tab.
To add terrain, click the “Add” icon. Use the blue circle to place the terrain you’d like. You can change the terrain’s appearance by clicking the “Materials” tab; there are lots of cool texture options! Whether you’re creating a mountain, ocean, or desert scene, there is a texture for every vision!
Clicking the “Subtract” icon will allow you to delete or erase terrain. How can change the size, and even the shape. For instance, in this example, if we keep it as a semi-circle, you can click the terrain to delete the portion clicked.
At this point, you should now know how to:
- Create ghost blocks
- Create Kill blocks
- Anchor blocks (so they float)
- Make terrain
- Subtract terrain
Meaning, you’re equipped with the skills to create your own obby! Watch the video below to see how the Taco Bros. went about completing their own creation, and then embark on your journey to creating the next hit game in Roblox.
If you’re passionate about gaming and all things tech, check out these related posts:
To take your skills to the next level, check out the iD Tech catalog of online classes for teens!