
Who wouldn't want to make and tell a story in Scratch? Creators can give players choices that change the paths the story takes and even alter the ending! Today we will dive into how to create a conversation between characters, switch backdrops, and hide and show characters while creating a story plot.
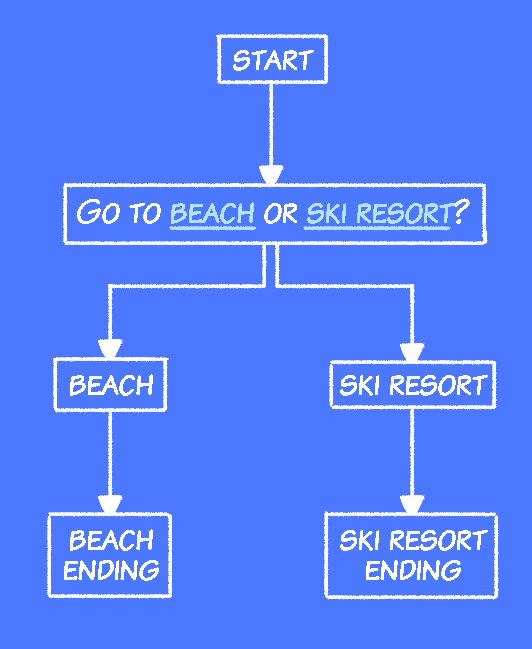
To make a game on Scratch and to create an interactive story, it's crucial to come up with a branching narrative: at set intervals in the story, there will be choices the player picks from that decide which branching path the player goes down.
For example, the game could ask the player whether they want to go to a beach or a ski resort. The answer the player chooses will change the location of the story and the events that take place there.
Because the answer can impact the entire game, the questions should be asked before one starts coding in Scratch in order to plan the different paths the story will take.
Plot and Plan
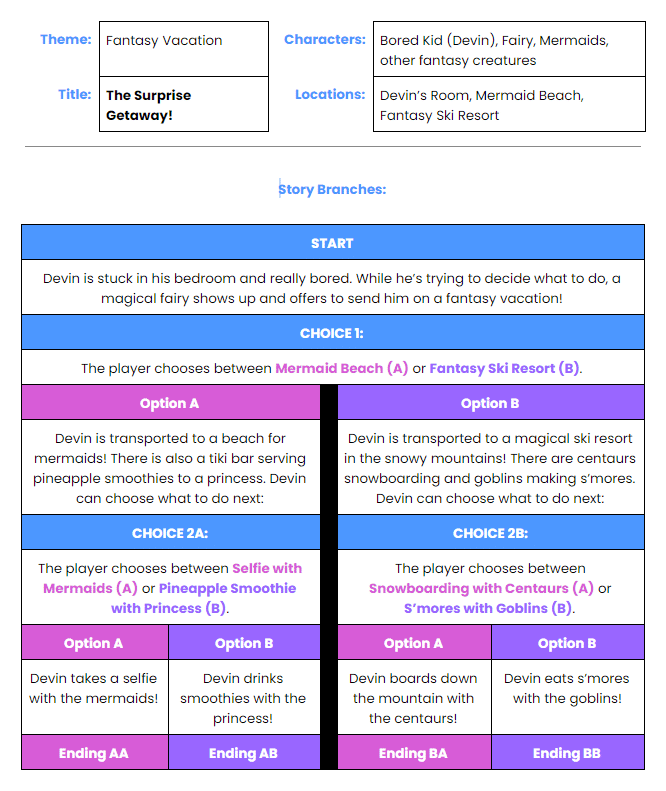
A story template helps plot the story theme and other details like characters, locations, and more.
Specifically, each story step should be outlined, moving the player from game start to choice 1, and then options A and B from that choice, and then choice 2A and 2B, and so on.
Set the Scene
Once planning has been completed, it's time to start creating, starting with a scene (which is any part of a story that takes place in one specific location).
For this example, let's say there are three scenes:
- Bedroom (where the story begins)
- Beach (option A)
- Ski Resort (option B)
To start with the first scene, which takes place in the bedroom, we need a Backdrop and the sprites.
- Add the Sprites and Backdrops needed for the first scene.
- Add two button Sprites that the player will able to click for choices.
- Add text onto the buttons in the Costumes tab of each Sprite.
Here is an example:

Broadcasting Messages
Now, to get from one scene to another, we will have to broadcast a message in Scratch. (A broadcast sends a message, or player choice, from one Sprite to another.)
A broadcast can tell all of the Sprites and Backdrops "the player was asked question A" or "the player answered question A with option B". This way, the Sprites can be told to act only if a question is answered a specific way.
- Select the Option A button (i.e. "Beach" choice).
- Add a when flag is clicked block and attach a go to front layer block, a go to x: 0, y: 60 block, and a hide block.
- Add a when I receive message1 block from the Events panel and click the drop-down to create a new message named question 1 asked.
- Attach a show block to this.

- Add a when this sprite clicked block and attach a broadcast message 1 block.
- Add a new message named question 1 answered A and then attach a hide block to it.
- Add another when I receive message1 block and add a new message named question 1 answered B. Then, attach a hide block.
- Copy the code onto Option B button and change when this sprite clicked broadcast to question 1 answered B.
- Change the second when I receive message to question 1 answered A.

When Beach (Option A) is clicked, it will broadcast a message to the game, saying "the player chose me!" After a choice has been made, both buttons will hide themselves.
Now, if following along and when this code is played, nothing happens, that's because Question 1 ("Where do you want to go?") hasn't been asked yet, so the player hasn't received the message they need to show up.
Learn more about how to make an "eat the apple" snake game in Scratch
Question and Answer
So, to get the buttons working, we need to ask the first question.
- Place the Sprites and add dialogue and sounds to make the first scene.
- For the Sprite that asks Question 1 (i.e., "Where do you want to go?"), attach a broadcast message1 and pick question 1 asked.

Now that Question 1 has been asked and broadcasts a message, the buttons will show up! When a button is clicked, it will broadcast its own message so the game knows which Option (A or B) has been chosen.
Adding a Scene Change
A scene change happens when the characters go to a new location (scene). Since there are two Options, the game will have two scene changes.
- To the Sprite(s), add when I receive question 1 answered A and attach some unique dialogue for both A and B (i.e., "I want to go to the Beach!" or "Let's go to the the Ski Resort!").
- For the character who changes the scene (i.e. the Fairy Sprite after saying, "Let's go!"), attach a broadcast block with a new message named scene change A.
- Duplicate the new blocks for Option B with a new message named scene change B.

Switching Backdrops
- Add a when flag is clicked with a switch backdrop to Backdrop 1 block so that every new game starts on the same scene.
- Add a when I receive scene change A block.
- Add a switch backdrop to Backdrop 2 block, as well as any optional effects and sounds if desired.
- Duplicate this for scene change B, switching to Backdrop 3 this time.

TIP! Adding a ghost effect will turn the image invisible depending on what the variable is set to. A 0 will result in no change, while a 100 will the the image fully invisible! Using the repeat block can create a gradual change from normal to invisible.
When the scene changes, either from Backdrop 1 to 2 or Backdrop 1 to 3, the character should react to being transported to a new location. Then, the player can be asked a new question that lets them choose between 2 endings for the scene, and so on.
Once all the choices and buttons have been coded, all that's left is to create endings. Yes, plural! Meaning, if the story has four final choices (say, two for Scene A and two for Scene B), there can be four unique endings.
We won't get into the coding piece here, but here are some examples:
- Add an ending conversation between the characters.
- Create an ending screen
- Show the character being sent back to their starting location, making the game loop back to the beginning to be played again
Game on!
To recap, this is one of the easiest Scratch games to make, while still challenging kids dig into their imaginations while using code and art. Creating a branching narrative story game gives the player the power to change a story and choose the ending. Then, one can use when sprite clicked with broadcast blocks and messages to create clickable options.
When a player is given multiple options in a story, it creates a branching narrative—giving lots of opportunity for replaying the game!
Want to learn more? Check out the different coding websites like Scratch, or any of our many Scratch camps and Scratch coding classes.
Featured Posts
Meet iD Tech!
Sign up for our emails to learn more about why iD Tech is #1 in STEM education! Be the first to hear about new courses, locations, programs, and partnerships–plus receive exclusive promotions! Online camps, Roblox coding classes, ai for kids, and more.
Meet iD Tech!
Sign up for our emails to learn more about why iD Tech is #1 in STEM education! Be the first to hear about new courses, locations, programs, and partnerships–plus receive exclusive promotions! Online camps, Roblox coding classes, ai for kids, and more.
Related posts
Featured Posts
Meet iD Tech!
Sign up for our emails to learn more about why iD Tech is #1 in STEM education! Be the first to hear about new courses, locations, programs, and partnerships–plus receive exclusive promotions! Online camps, Roblox coding classes, ai for kids, and more.
Meet iD Tech!
Sign up for our emails to learn more about why iD Tech is #1 in STEM education! Be the first to hear about new courses, locations, programs, and partnerships–plus receive exclusive promotions! Online camps, Roblox coding classes, ai for kids, and more.