
The moment a child creates their first Scratch game, watches their sprite move across the screen, and hears the score increase with a satisfying "pop" sound? That's when coding stops being abstract and becomes very real.
As you progress through your Scratch journey, you’ll begin to see just how much your kids can create. While the opportunities aren’t endless, there are many! And easy games to create in Scratch at that.
This guide explains how to make a game on Scratch with “block-based coding” while detailing how kids can create their first title from start to finish.
Step 1: Brainstorm Your Game
Before jumping into Scratch coding, kids should spend 5 minutes thinking about what they want to build. Good game design starts here.
They can ask themselves three questions:
What is the main objective?
Here are some proven options:
- Clicker Game: Players click on-screen sprites to earn points. Example: clicking falling tacos, where smaller tacos earn more points.
- Chase Game: Control a sprite and move it around to catch or avoid other sprites. Example: a shark chasing fish, earning points on contact.
- Pong Game: Use the mouse to guide a paddle and knock a ball back and forth. Learn more about how to create a pong game in Scratch
- Story Game: Players progress through an interactive story by making choices. Example: choose between a beach or ski resort, then experience different outcomes.

Pick one. You can always create more games later.
What will be the level of difficulty?
A game that's too easy gets boring fast. A game that's too hard causes frustration and abandonment. The sweet spot? A game that's challenging enough to be engaging but not so hard that it feels impossible. Players should feel like they almost won, which makes them want to try again.
Who is playing this game?
Are you building this for yourself or to share with friends? This influences the theme, difficulty, and how "polished" it needs to feel.
Step 2: Add a Backdrop
Every game needs a visual setting. Scratch comes with a library of ready-made backgrounds, or your child can create one.
To add a backdrop:
- Click the "Choose a backdrop" button in the bottom right corner
- You'll see options to:
- Upload your own image
- Surprise for a random selection
- Paint to create your own
- Choose from the library
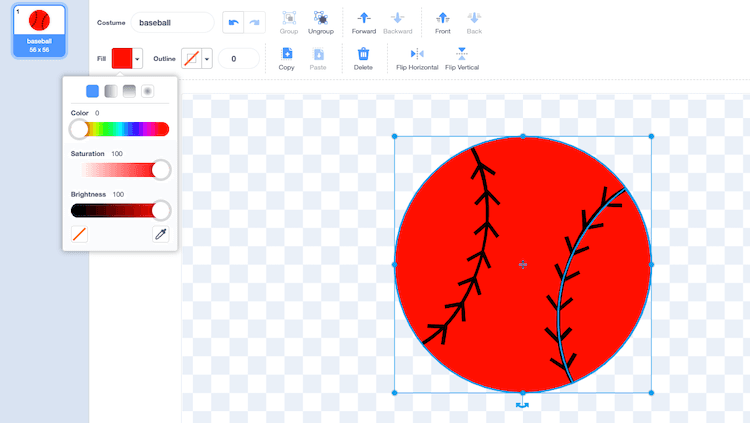
For this guide, we're building a baseball clicker game, so we'll choose the baseball field backdrop.

Pro tip: The backdrop sets the tone for your entire game. A space background feels different than an underwater setting. Choose something that matches your game's theme and makes you excited to build.
Learn more: How to change Scratch backgrounds
Step 3: Add a Sprite
A Scratch Sprite is any object in your game—a character, an animal, a ball, even a button. Every game needs at least one.
To add a sprite:
- Look at the bottom right of the screen, near where you added the backdrop
- Hover over the Sprite icon
- Choose to Upload, Paint, or Choose from the library
For our baseball game, we're choosing a baseball sprite from the library.
![]()
You can:
- Rename sprites by right-clicking and selecting "rename"
- Add multiple sprites by repeating this process
- Duplicate sprites (we'll do this later to create "good" and "bad" balls)
Learn more about how to create Scratch Sprites or how to make a Sprite character jump.
Step 4: Set Up Your Game with Code Blocks
Now we're coding. Don't worry—Scratch uses visual blocks, not text, so you'll see exactly what each instruction does.
The first block you need is the "when green flag clicked" block.
This block tells Scratch: "Start running the code when the player clicks the green flag button." Every game starts here.
Find this block in the Events section (it's orange) and drag it to the coding area.
Next, create a variable to track the score:
- Go to the Variables section
- Click "Make a Variable"
- Name it "Score"
- Drag the "set score to 0" block under your green flag block
This tells the game: "When the game starts, set the score to zero."

Now make your sprite bigger (optional but fun):
Grab a "change size by 10" block from the Looks section and set it to 150. This makes your baseball bigger and easier to click.
Your code should now look like this:
- When green flag clicked
- Set score to 0
- Change size by 150%
Click the green flag to test. Your sprite should appear on the screen at its new size.
Step 5: Make Your Sprite Move
A stationary sprite isn't much of a game. Let's add movement.
Grab a "forever" block from the Control section. This creates a loop—code that repeats endlessly.
Inside the forever block, add:
- "Glide 1 secs to random position" (makes the sprite move smoothly to a random spot)
- "Turn 90 degrees" (rotates the sprite)
- "If on edge, bounce" (makes the sprite bounce off the edges instead of disappearing)
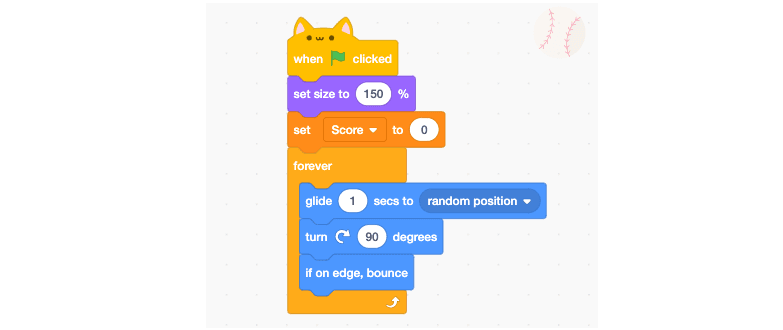
Your code now looks like:
- When green flag clicked
- Set score to 0
- Change size by 150%
- Forever
- Glide 1 secs to random position
- Turn 90 degrees
- If on edge, bounce
Click the green flag again. Your sprite should now move around the screen continuously.
Step 6: Make the Sprite Clickable (Add Difficulty)
Right now, the sprite moves, but clicking it does nothing. Let's change that.
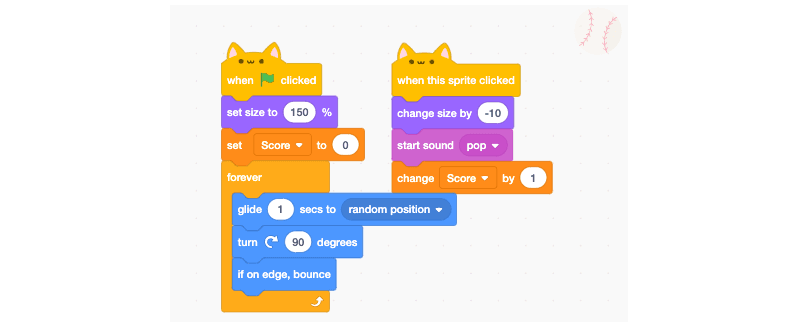
Add a new block: "when this sprite is clicked" (from the Events section)
This is a separate event—it doesn't connect to your other code. It only runs when someone clicks the sprite.
Under this block, add:
- "Change size by -10" (makes the sprite 10% smaller each time it's clicked)
Now when players click the sprite, it shrinks. This creates difficulty—the sprite gets harder to click as the game goes on. Difficulty and challenges are some of the  things that make the game fun, right?
Test it: Click the green flag, then click your moving sprite. It should get smaller with each click.
Step 7: Add Sound Effects
Every click should feel satisfying. Let's add sound.
Grab a "start sound" block from the Sound section and attach it to your "when sprite is clicked" event.
Click the dropdown where it says "pop" to choose a different sound, or select "record" to create your own.
For now, "pop" works great.
Your "when sprite is clicked" code now looks like:
- When this sprite is clicked
- Start sound (pop)
- Change size by -10
Test it: Click the sprite. You should hear a "pop" sound with each click.
Step 8: Increase the Score
You've been tracking the score, but it's not increasing yet. Let's fix that.
Go back to the Variables section and grab the "change score by 1" block.
Attach it to your "when sprite is clicked" event, after the sound block:
- When this sprite is clicked
- Start sound (pop)
- Change size by -10
- Change score by 1
Now when you click the sprite, three things happen:
- The sprite shrinks
- A sound plays
- The score increases by 1
Test it: Click the green flag and start clicking your sprite. Watch the score counter in the top left increase with each click.
Step 9: Create a "Bad" Sprite to Add Strategy
Right now, clicking any sprite increases your score. Let's make it more interesting by adding a sprite that decreases your score.
Duplicate your baseball sprite:
- Right-click the sprite in the Sprite panel
- Select "Duplicate"
This creates an exact copy with all the same code.
Now customize the duplicate:
- Click the "Costumes" tab
- Select your duplicated sprite
- Change its color to red (or another color)
- Click back to the "Code" tab
Modify the code for this red sprite:
- When this sprite is clicked
- Start sound (pop)
- Change size by +10 (instead of -10, so it grows)
- Change score by -1 (instead of +1, so it decreases the score)
Now you have two sprites:
- White baseball: Click to increase score (shrinks as you click)
- Red baseball: Avoid clicking (grows larger, decreases score)
Test it: Click the green flag. Now you have a real game—click the white ball to gain points, avoid the red ball to keep your score high.
Step 10: Add a Timer (Optional but Recommended)
Right now, your game has no end condition. Let's add a timer to create urgency.
Create a new variable called "Time":
- Go to Variables
- Click "Make a Variable"
- Name it "Time"
Under your "when green flag clicked" block, add:
- Set Time to 30 (or however many seconds you want)
- Forever
- Wait 1 second
- Change Time by -1
- If Time = 0, stop all
This creates a 30-second game. When time runs out, everything stops.
Your complete "when green flag clicked" code now includes:
- Set score to 0
- Set Time to 30
- Change size by 150%
- Forever (with movement blocks)
- Forever (with timer blocks)
Step 11: Add a Game Over Screen (Optional)
When the game ends, players should see something that says "Game Over" and shows their final score.
Create a new sprite that says "Game Over":
- Click "Choose a Sprite"
- Select "Paint" to create a custom sprite
- Use the text tool to type "GAME OVER"
- Make it large and visible
Add code to this sprite:
- When green flag clicked
- Hide (so it doesn't show at the start)
- Wait until Time = 0
- Show
- Say "Final Score: [score]" for 3 seconds
Now when time runs out, the "Game Over" sprite appears and displays the final score.
Common Beginner Mistakes (And How to Fix Them)
"My sprite won't move"
- Check: Did you add the "forever" loop? Movement blocks MUST be inside a forever loop.
- Check: Did you use "glide" or just "move"? "Move" is too fast to see clearly.
"The score doesn't increase"
- Check: Is the "change score by 1" block connected to the "when sprite is clicked" event?
- Check: Did you forget to add the "change score by 1" block entirely?
"My game runs too fast or too slow"
- Adjust the "wait" blocks (add more seconds to slow down)
- Adjust the "glide" time (increase the number to slow movement)
"My sprite disappears"
- Check: Did you use "if on edge, bounce"? Without it, sprites disappear off-screen.
- Check: Is your sprite's size set to 0%? Set it back to 100%.
"I can't click my sprite"
- Check: Is the sprite too small? Make it bigger with "change size by 10"
- Check: Is the "when sprite is clicked" block actually in your code?
"The timer doesn't work"
- Check: Did you create a variable called "Time"?
- Check: Is the timer code inside a "forever" loop?
The Real Magic of Scratch
The beauty of Scratch isn't that it teaches kids to code—though it does. It's that it shows them that they can create something interactive and fun with just a few blocks of logic. It's what makes Scratch one of the best programming languages for kids.
That's the moment kids stop saying "I can't code" and start saying "What should I build next?"
Now go build something amazing. Check out our Scratch summer camps and Scratch coding lessons.
