How to Make a Pong Game in Scratch

Virginia
February 04, 2022

Scratch, one of the most beginner-friendly coding languages for youngsters, is as simple to use as it is fun! So, if your child has shown an interest in the program, here is the perfect challenge to take their new coding skills to the next level.

They might have already learned how to create a sprite in Scratch, or even tried their hand at coding their first Scratch game: and if so, making a pong-style game in Scratch is a great next step! 

In this tutorial, we’ll walk through one of the easiest games to create on Scratch—a custom version of Pong, using variables to keep track of the player's score. The player will control a paddle with their mouse and hit a ball to earn points! 

For a quick preview, take a look at the game below to see what kids will be making. 

Pong game tutorial in Scratch 

Kids will need a few basic elements for their game: sprites, sensors, a scoreboard, a ping pong ball-inspired icon, and, of course, a fun backdrop! Here’s a step-by-step guide to creating a customized masterpiece in Scratch. 

1. Set up the sprites

Before they start coding, kids should pick out their sprites and position them against the backdrop. We recommend using pre-made sprites (from the "Choose a Sprite" database in Scratch) while they're setting up the code. There’s always time to customize further later! 

1. Click "Choose a Backdrop" to find a background for the game.

2. Click "Choose a Sprite" to find the "Star" or "Ball" sprite. Set its x and y position to 0, 0 in the sprite's properties.

Kids can also change the sprite's size property if they think the sprite looks too big or small.

3. Click "Choose a Sprite" and add the "Paddle" sprite to the project.

4. Set the paddle's Direction to 0, and its x, y position to -216, 0.

5. Right-click and Duplicate the paddle. Set the copy's x, y position to 216, 0.

2. Code the Pong ball

1. Add when clicked to the Star (or Ball) sprite's code area.

2. Attach a go to x, y block set to 0, 0 and a point in direction block set to 45.

3. Attach a forever ↺ block to the code.

4. Inside the block, add move with 20 stepsturn ↻ with 1 degree, and an if on edge, bounce block.

3. Sense the paddle

Sensors are blocks of code that can track the player's movements or sense when one sprite is touching another sprite. In this case, the paddle will act as a sensor. 

Read More: How to make a Snake game in Scratch

Right now, the ball will pass through the paddle instead of bouncing off of it. To hit the ball, it'll have to sense when it's touching the paddle.

1. Add another when the flag button is clicked to block the code area.

2. Attach a forever ↺  block. Inside of that, add the  if <> then block. 

3. Add if/then variables.

Kids will need to add some “if/then” blocks to complete this feature. As an example, imagine you're eating a pizza. If you take a slice from the pizza, then the number of slices will go down by 1. Coding it would look like: [ if < slice is taken > then [ change pizza slices by -1 ] ].

The if <> then  block is like a question: if this happens, then this will happen because of that. In this code, the question will always be asked, because it's in a forever ↺  loop. The code will ask: "Is the ball touching the paddle?" over and over. When the ball does touch the paddle, then it will bounce off the paddle.
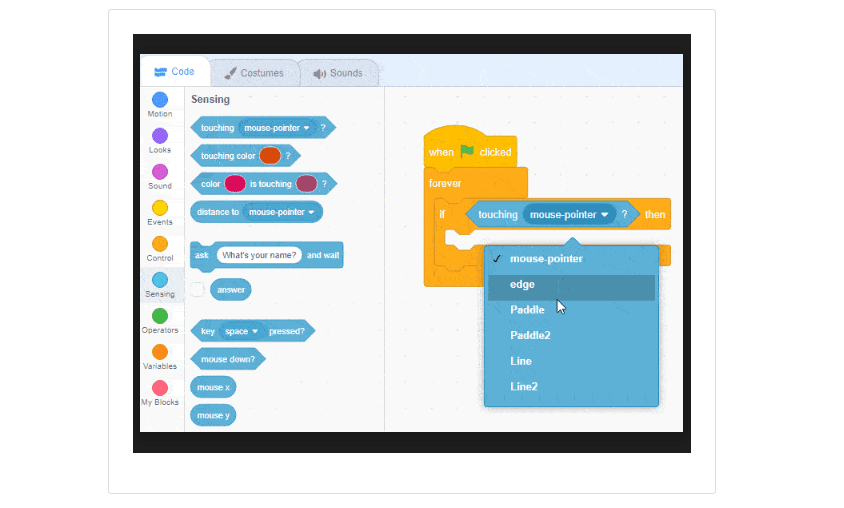
1. In the Sensing panel, drag  <touching mouse-pointer?>  into the  if  statement's bracket.

2. Click the sensor's dropdown to select Paddle.

3. Inside the statement, add  turn ↻ set to 180 degrees,  move set to 15 steps, and a wait  block with 0.5 seconds.

4. Right-click and Duplicate the code. Change the copy's <touching Paddle?> to Paddle2.

4. Player paddle setup

There are two paddles—the first one, on the left side of the game screen, will be controlled by the player.

1. Select the player's Paddle sprite and add when the flag button is clicked in the code area.

2. Attach a forever ↺  block, and within that add the set y to block from the Motion panel.

3. In the Sensing panel, drag a (mouse y)  bubble into the set y variable. The (mouse y) sensor tracks the player's mouse movements across the y axis (up and down). This code will make it so the paddle always follows the player's mouse.

5. Enemy paddle setup

The second paddle, positioned on the right side of the game screen, will be the "enemy." This paddle will move on its own.

1. Select the Paddle2 sprite and add when the flag button is clicked to its code area.

2. Attach a set color effect block with a value of 125 to turn the paddle red.

3. Below, attach set y to 0 and a forever ↺ block.

4. Inside, add “move”  set to 15 steps and  if on edge, bounce .

If kids test the game now, they should be able to knock the pong ball back and forth between the paddles! See how the player's paddle follows the mouse? That's because there’s a sensor to track the mouse movements! Pretty cool, right?

Next, they’ll add a variable to keep track of which side has scored the most points.

6. Make Goal Lines

These "Line" sprites will sense when the ball touches the goal.

1. Click "Choose a Sprite" and add the "Line" sprite to the project.

2. Set the sprite's Direction to 0 and x, y position to -236, 0.

3. Right-click and Duplicate the sprite. Set the copy's x, y position to 236, 0.

7. Make Variables

1. In the Variables panel, click "Make a Variable."

2. Create a variable named "score" and another named "enemy." Make sure each variable is checked on. This will make them visible in the game.

8. Tally the Scores

Select the Line sprite and add when the flag is clicked to its code area.

1. Attach set enemy to 0 and a forever ↺ block to the code.

2. Inside, add an if <> then block with the <touching Ball?> sensor.

3. Inside the if <> then statement, add a change enemy by 1 block.

4. Copy the code onto Line2 and change the enemy variables to "score."

Don't forget to test the code!

As kids continue to develop their coding skills, they’ll learn that testing and debugging is a key part of the process.

Once that’s done, it’s time to enjoy the game they built themselves!

Doesn’t that make game time all the more enjoyable?

Explore more fun with Scratch coding classes through Virtual Tech Camps, Online Private Lessons, and these resources:

Meet iD Tech!

Sign up for our emails to learn more about why iD Tech is #1 in STEM education! Be the first to hear about new courses, locations, programs, and partnerships–plus receive exclusive promotions! AI summer camps, coding classes for kids, and more!

By signing up you agree to our Privacy policy
Subscribe & Save!

Meet iD Tech!

Sign up for our emails to learn more about why iD Tech is #1 in STEM education! Be the first to hear about new courses, locations, programs, and partnerships–plus receive exclusive promotions! AI summer camps, coding classes for kids, and more!

By signing up you agree to our Privacy policy